Thursday, February 23, 2017

Simple Pose Guidlines

Many art and manga how-to books( Mark Crilley, I'm talking about you) seem to drown the reader with guidelines and stress how intricately you need to plan out everything before you actually get around to drawing your manga character.
My style is to forego all the extras and use guidelines you actually need.

First I create a skeleton using rough gestures where I want the limbs and circles to indicate joints, and then I flesh it out. I use this skeleton to create all my poses.
I used a blue pencil to differentiate the skeleton from the actual figure.

The girl figure has a small chest connected by one motion line/spine to the 'box'
that is her hips to create a curvy look, while the guy's torso is a complete rectangle for a more masculine body.
The other difference I make is that the girls have bigger hips and the guys will usually have broader shoulders.
Another thing to note is that the leg lines always come from the corners of the hips.
------------------------------------------------------


 Because it's not a cut-and-paste guideline base, sometimes I end up putting a limb where it just can't go.

In the pose on the right, the boy's feet were in the wrong position, and I changed the right arm's placement in the fleshing-out stage.

I could keep typing, but the best way to learn this guideline base is to look at the examples above and sketch out a few of your own. So where are your pencil and paper??


This skeleton approach is also used by Irene Flores, one of my favorite How-To-Draw Manga artists, Author of the Shojo Fashion series. Go check her work out on Beanclamchowder.com

Sunday, February 19, 2017

Sketch Dump

I haven't done one of these in awhile. Anywho, here are all the projects I've been working on recently.


 This character that dominates these last couple of pictures doesn't quite have a name yet, but she's been on my mind a lot lately. It's all fuzzy right now, but she's some type of hit-man/assassin that is working undercover in the resistance. 'Cause of her I'm drawing a lot more ponytails.


She kinda scares me, but at the same time she fascinates me- she is my own character after all.


Friday, February 17, 2017

Drawing the face front veiw

Just a quick face tutorial I sketched up this morning to share with you. :)
We've all drawn that face where it looks like we're training under Picasso- and for manga, that's not a good thing. I created this face-map as a means to keep all the facial features balanced while having as little guidelines in my way as possible.

In 2 I start with the ears because they give me the perfect line( right across the tips) to place the eyes. If you're worried about symmetry you can add a vertical line straight through to make sure the eyes are the same distance from the center. I don't worry about it because the asymmetry of my art creates a more natural feel.

 That's all for today mi amigos!

Thursday, February 16, 2017

Group Dates, Introverts, and Comics

Ah, February. Valentines and chocolates and love and... what is that plushy thing??
Anyway, I don't know all about that but Imma write you some fluff today.

Last weekend my older sister and I were going to a dance together, and she already had a group date planned- and planned on me and my nonexistent-at-the-time-date to make up the other pair for a board game party.
I stands for Introvert, and I the introvert, overthought about how to ask someone out, and while I was debating word choice, I had a epiphany! Maybe I wasn't great at asking a guy out, but I WAS a good comic maker. I created the following comic to ask one of my awesome artist friends to go with me.

After I sent it I had to go to work. I wouldn't know his answer until after the day ended. My idea was that he wouldn't type back( Everyone does everything over facebook nowadays) but would fill in the word bubble. He didn't.
.
.
.
.
.
... Instead he sent a comic of his own. :DDD
He has his own webtoon under Presley with funny and #relatable comics. (my favorites are 3, 9, 11, 12 and the Q&A special)
We met up at the dance later, and I had a great time playing games( Uno what I mean) and talking about art. :P So I got to have fun and you get to have a new comic. Happy? I am. XD

Tuesday, February 14, 2017

How to Use a Quill Tip Pen

Known as both a Quill pen and a Dip pen, THIS is the traditional weapon *cough**cough* -I meant tool- of mangakas, along with many others.
Because rendering with a dip pen was taught orally through the generations, it is getting harder and harder to find instructive materials that do not start with 'undoubtedly the inventions and gradual improvement of the various processes of photo-mechanical reproduction have provided fairly cheap and faithful...' yeah. You get the idea.*
So I did your homework for you( actually, my mom did it way before me), I have scoured some of the best 'How to use a quill pen' books and can translate their 'ye olde english' for you( thanks mom).

Beginner's Tools:
1) A plastic pen-holder from Dick Blick
2) A case of Zebra G pen nibs ( fairly cheap @ Blick)
3) Ink( I prefer black India). I am using a Bombay bottle but I refill it with Higgins.


Pen nibs are a consumable product, but you do want to take care of them so they last.
When you buy your tips they will come coated in an oil to prevent rust. It's common practice to 'scorch'( hold the nib to a flame for a second or so). This removes the oil and a scorched nib will spread the ink better.
After every use, make sure to clean your nibs. I use a baby wipe with some rubbing alcohol, but you can also use water. If you use water, make sure to dry your nib afterwards(!!!).
Do not let any tissue or cloth fibers catch in your nib: it'll ruin the evenness of your lines!

I fill my pen to the 'halfway point'( indicated in red) for the longest time in between dips into the ink and the least danger of drips.


Now that you know how to handle the technicalities, take your pen in hand and adjust it to mirror the picture above. Before you can create confident lines and stunning masterpieces you have to be comfortable with using a pen. Just like any other medium( acrylic, markers, etc.) it takes practice. DAILY practice.
Here are some exercises that I do to gain confidence in my inking skills. I suggest doing some of these every other day and/or right before you start on a inking project.


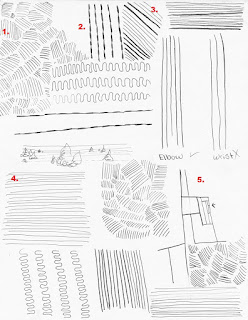
On the left is a large doodle. Before and after my exercises I use up an entire page to create all kinds of flowing lines; before, to get comfortable with my pen, and after, to loosen up my fingers.

On the left are 5 of my regular exercises.
1) all the movement comes from your wrist. Make tight patches of line of varying direction to create a giraffe-like pattern.
2) While drawing downward lines, try increasing and decreasing the width. When creating long lines like this, move your arm, not your wrist- this will create straighter, more defined lines. shown right above 5
3) practice tilting your pen and varying pressure to create thin and thick lines. Push it to see just how tiny or how HUGE you can make them.
4) Again, move your arm, not your wrist to create steady horizontal lines.
5) Start with one line, now draw one off of that; and one off of that last one. Keep drawing lines until you box yourself in.
Try to fill one page with these exercises each session.

A few notes on paper:

Do not use copy paper for your exercises/inking. The cheap printer paper will tear and soak easily, and the metal pen nib will catch on it's ruff surface.
You should use Card stock or another thicker/smoother paper to ensure that you're making the best lines.


*This is an actual line from 'Rendering in Pen and Ink' by Arthur L. Guptill, probably the best book on 'how to' for Quill pens and all types of inking. I recommend it for anyone serious about becoming a master with traditional inking.
Another great book is 'How to Pen and Ink,' a collaborative book by Yasuhiro Nightow, Oh! great, and Satoshi Shiki. It has much more modern language and focuses on the manga style( however it's definitely PG-13 for some nudity. I touched up my copy with a permanent marker).