Because rendering with a dip pen was taught orally through the generations, it is getting harder and harder to find instructive materials that do not start with 'undoubtedly the inventions and gradual improvement of the various processes of photo-mechanical reproduction have provided fairly cheap and faithful...' yeah. You get the idea.*
So I did your homework for you( actually, my mom did it way before me), I have scoured some of the best 'How to use a quill pen' books and can translate their 'ye olde english' for you( thanks mom).
Beginner's Tools:
1) A plastic pen-holder from Dick Blick
2) A case of Zebra G pen nibs ( fairly cheap @ Blick)
3) Ink( I prefer black India). I am using a Bombay bottle but I refill it with Higgins.
Pen nibs are a consumable product, but you do want to take care of them so they last.
When you buy your tips they will come coated in an oil to prevent rust. It's common practice to 'scorch'( hold the nib to a flame for a second or so). This removes the oil and a scorched nib will spread the ink better.
After every use, make sure to clean your nibs. I use a baby wipe with some rubbing alcohol, but you can also use water. If you use water, make sure to dry your nib afterwards(!!!).
Do not let any tissue or cloth fibers catch in your nib: it'll ruin the evenness of your lines!
I fill my pen to the 'halfway point'( indicated in red) for the longest time in between dips into the ink and the least danger of drips.
Now that you know how to handle the technicalities, take your pen in hand and adjust it to mirror the picture above. Before you can create confident lines and stunning masterpieces you have to be comfortable with using a pen. Just like any other medium( acrylic, markers, etc.) it takes practice. DAILY practice.
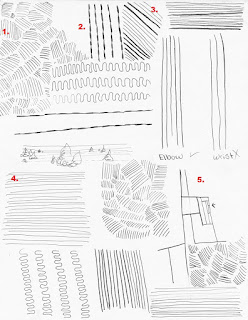
Here are some exercises that I do to gain confidence in my inking skills. I suggest doing some of these every other day and/or right before you start on a inking project.

On the left is a large doodle. Before and after my exercises I use up an entire page to create all kinds of flowing lines; before, to get comfortable with my pen, and after, to loosen up my fingers.
On the left are 5 of my regular exercises.
1) all the movement comes from your wrist. Make tight patches of line of varying direction to create a giraffe-like pattern.
2) While drawing downward lines, try increasing and decreasing the width. When creating long lines like this, move your arm, not your wrist- this will create straighter, more defined lines. shown right above 5
3) practice tilting your pen and varying pressure to create thin and thick lines. Push it to see just how tiny or how HUGE you can make them.
4) Again, move your arm, not your wrist to create steady horizontal lines.
5) Start with one line, now draw one off of that; and one off of that last one. Keep drawing lines until you box yourself in.
Try to fill one page with these exercises each session.
A few notes on paper:
Do not use copy paper for your exercises/inking. The cheap printer paper will tear and soak easily, and the metal pen nib will catch on it's ruff surface.
You should use Card stock or another thicker/smoother paper to ensure that you're making the best lines.
*This is an actual line from 'Rendering in Pen and Ink' by Arthur L. Guptill, probably the best book on 'how to' for Quill pens and all types of inking. I recommend it for anyone serious about becoming a master with traditional inking.
Another great book is 'How to Pen and Ink,' a collaborative book by Yasuhiro Nightow, Oh! great, and Satoshi Shiki. It has much more modern language and focuses on the manga style( however it's definitely PG-13 for some nudity. I touched up my copy with a permanent marker).


Wow! That sounds super complicated. I'm impressed you can do that. You make it look so easy. :)
ReplyDeleteThanks for the tutorial. If I ever get one, I'll definitely come back here. :D
Oh! I also really like the last two drawings you did! So pretty!
DeleteThank you Chloe! The last two pictures were inspired by a song called paper crown by Alec Benjamen.
DeleteYou're welcome! ^.^
DeleteThat's awesome! I'll have to look up the lyrics or listen to the song sometime. :)